
Description
Quickly sync data between ScaleGrowth AI and thousands of other apps by sending POST Webhooks to Zapier – no code required.
Prerequisites
- Admin access to your ScaleGrowth AI workspace
- A Zapier account
- The target app connected in Zapier (e.g. HubSpot, Salesforce, Slack)
1. Create or Edit a Workflow in ScaleGrowth AI
- Navigate to: Enter Admin > User Journeys > Workflows.
- New or existing: Click Create a New Workflow or edit an existing one.
- Enable the Workflow.
- Trigger Event: Select an event such as User Group: Member Added to [Your User Group].
- Scheduling: Leave the default to Run This Workflow set to Right Away.
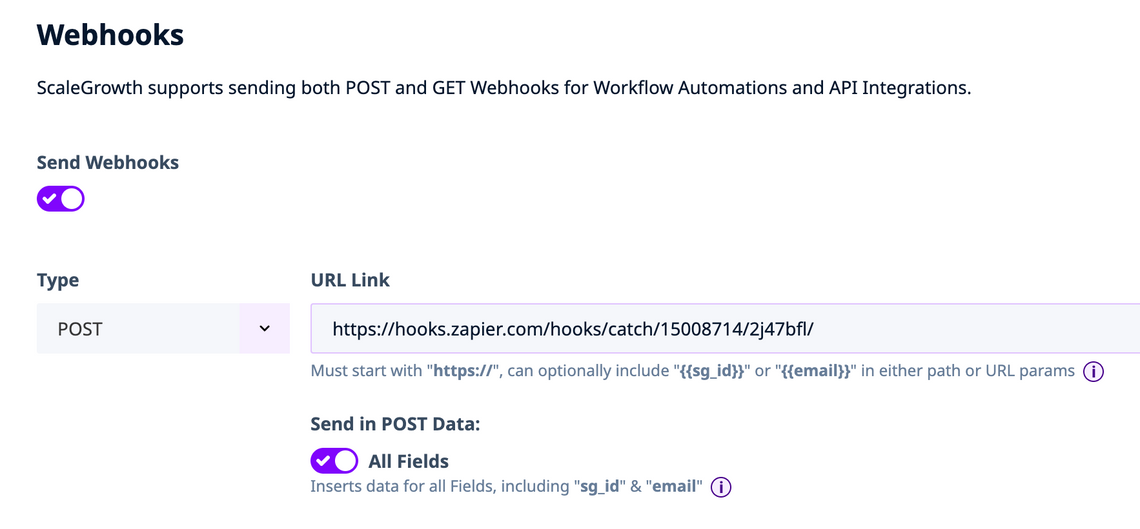
2. Enable & Configure the Webhook Action
- Scroll to Webhook at the bottom of the workflow form.
- Toggle Send Webhooks ON.
- Method: Select POST (required for sending data).
- Leave the URL blank for now – we’ll paste the Zapier catch URL in the next step.
- Payload options:
- All Fields – sends the full member profile (recommended for CRM syncs).
- ID Only or Email Only – lighter payloads if your Zap expects just an identifier.
- Click Save (you’ll return to finish after creating the Zap).
Tip: Click the ℹ️ icons to see the exact payload schema and how to reference API Field Names (visible under Admin → User Journeys → Member Onboarding & Profile → Profile → Edit Fields).
3. Build the Catch Hook in Zapier
- In Zapier, click Create Zap.
- Trigger → Search Webhooks by Zapier.
- Event: choose Catch Hook → Continue.
- Copy the Custom Webhook URL Zapier provides.
4. Paste the Zapier URL Back in the Workflow
- Return to the workflow’s Webhook section.
- Paste the Zapier POST URL.
- Save the workflow again – it’s now live.
5. Test the Integration
- In Zapier, keep the trigger step in Test mode (listening).
- Perform the trigger action in ScaleGrowth AI – e.g. add a test member to the demo group.
- Zapier should instantly catch the request and display the JSON payload.
- Click Continue when the test is successful.
6. Map Data to Your Destination App (Example: HubSpot)
- Action step → choose HubSpot → Create Contact.
- Connect your HubSpot account.
- In the field‑mapping screen, Zapier shows every property from the webhook:
- First Name → member.first_name
- Last Name → member.last_name
- Company Name → company_name (API field)
- Map any other custom fields as needed.
- Test & Continue to create a sample contact in HubSpot.
- Publish Zap to activate the automation.
7. Advanced Options (Optional)
Security headers or secret tokens
- Add them in the Advanced Webhooks section of the workflow for extra verification on the receiving side.
Custom URL parameters
Append placeholders such as {{sg_id}} or {{email}} directly in the Webhook URL if the target endpoint needs them.
Selective payloads
- Switch the drop‑down from All Fields to ID Only or Email Only to keep the payload lean.
Alternate receivers
- Any tool that accepts inbound Webhooks – e.g. Postman, Make.com, custom APIs – can replace Zapier if preferred.
Troubleshooting Checklist
- No payload received: Confirm the workflow is Enabled and the trigger actually fired.
- Zap fails to parse data: Verify you used POST and All Fields (or match IDs correctly).
- CRM records duplicated: Add a Find‑or‑Create step in Zapier before Create Contact.
- Security errors: Configure authentication headers under Advanced Webhooks.
Summary
By combining ScaleGrowth AI workflow Webhooks with Zapier’s Catch Hook, you can push real‑time member data into any of Zapier’s integrations – keeping your CRM, marketing tools, or internal systems perfectly in sync without writing custom code. For complex scenarios, leverage the Advanced Webhooks options to add headers, limit payloads, or secure your endpoints.
Have questions? Enter Admin, click Success Center → Ask Team – we’re here to help.
